

As the blockchain technology emerged as one of the fastest growing and game-changing new development in the technology industry, many tech giants including IBM, Microsoft, Amazon and HP came up with their own blockchain solutions for their customers in the last few months. BaaS (blockchain-as-a-service) is getting more and more attention. It turns out that the basis for bitcoin can be adapted for many other use cases. The distributed ledger technology (DLT) can be used to reduce the risk of fraud by increasing transparency. It also adds visibility to supply chains by allowing all parties to have a common, real-time view of transactions.
Microsoft Azure was one of the first major tech companies to announce BaaS functionality for organizations and developers. Azure makes the setup easy by providing an Ethereum Blockchain Consortium template, which features a configurable number of both mining and transaction nodes. In three steps, and about 10 minutes, you can set up a fully functioning private blockchain in the cloud.
Azure Blockchain options
Azure allows you to work on various blockchain networks. With the variety of pre-configured network topologies it offers, you can deploy the network within minutes. The solution also features unique benefits like easy VM scale sets, ability to manage nodes with cross-region deployments, and monitoring tools. Supported networks are Ethereum of course, Hyperledger Fabric, Corda, Stratis, Aion, Quorum, Ontology, Waves and lots more.
In 2018, Microsoft introduced Azure Blockchain Workbench to help businesses take their first steps towards building these new apps.
Azure Blockchain Workbench
The Azure Blockchain Workbench – Workbench for short – allows developers to deploy a blockchain ledger along with a set of relevant Azure services most often used to build a blockchain-based application. The deployment of all relevant components takes 30 to 60 minutes. That’s a lot of time saved and not spent configuring the required infrastructure and cloud services. This way, developers and architects can focus on application logic and workflows.
The main features of Workbench are:
- Provisioning a complete set of services needed to run a permissioned blockchain
- Sample projects and documentation
- A REST API
- Integration with IoT, Office
- Data and Reporting options
Deploying a blockchain network
Azure Blockchain Workbench simplifies consortium blockchain network setup as a preconfigured solution with an Azure Resource Manager solution template. The template provides simplified deployment that deploys all components needed to run a consortium.
If you want, you can connect to an existing Ethereum blockchain network. However, the endpoint must be an Ethereum Proof-of-Authority (PoA) blockchain network. Blockchain Workbench accounts are not funded. If funds are required, the transactions fail. In PoA, each consensus node on the network has its own Ethereum identity. In the case that a node goes down, it’s important that the member doesn’t lose consensus participation. Ideally, each member would run redundant consensus nodes to ensure a highly available network presence. To accomplish this, Microsoft built an abstraction which allows each consensus participant to delegate multiple nodes to run on their behalf. Each Azure Proof-of-Authority network comes with an identity leasing system that ensures that no two nodes carry the same identity. In the case of a VM or regional outage, new nodes can quickly spin up and resume the previous nodes’ identities.
Create blockchain applications
With Workbench, you can define blockchain applications using configuration and writing smart contract code. Once deployed, Workbench provides access by means of a web application and a REST API to be used in custom apps.
Manage applications and users
Azure Blockchain Workbench provides a web application and REST APIs for managing blockchain applications and users. Blockchain Workbench administrators can manage application access and assign your users to application roles. Azure AD users are automatically mapped to members in the application.
Integrate blockchain with applications
You can also use the REST APIs and message-based APIs to integrate with existing systems. The APIs provide an interface to allow for replacing or using multiple distributed ledger technologies, storage, and database offerings. Workbench can transform messages sent to its message-based API to build transactions in a format expected by that blockchain’s native API. Workbench can sign and route transactions to the appropriate blockchain. Workbench automatically delivers events to Service Bus and Event Grid to send messages to downstream consumers. Developers can integrate with either of these messaging systems to drive transactions and to look at results.
Use Active Directory login
With existing blockchain protocols, blockchain identities are represented as an address on the network. Azure Blockchain Workbench abstracts away the blockchain identity by associating it with an Active Directory identity, making it simpler to build enterprise applications with Active Directory identities.
Synchronize on-chain data with off-chain storage
Azure Blockchain Workbench makes it easier to analyze blockchain events and data by automatically synchronizing data on the blockchain to off-chain storage. Instead of extracting data directly from the blockchain, you can query off-chain database systems such as SQL Server. Blockchain specific expertise is not required for end users who are doing data analysis tasks.
Version 1.6
In January 2019, Microsoft announced a few updates to Azure Blockchain Workbench. The release of v 1.6.0 brings with it new features including application versions, an egress messaging API, and streamlined smart contract development. Upgrades can be made by deploying a new instance via the Azure portal or by running an upgrade script. However, developers are asked to make note of breaking changes included in the release.
The first major update, in response to requests for the feature, is the ability to manage and version Workbench applications. Version 1.6.0 offers support for application versioning via the REST API and the web app allowing users to bypass making manual changes and updates to their applications during the development process. Also updated in this release is an outbound messaging API. The API now lets users publish blockchain events via the Azure Even Grid and Service Bus, allowing consumers downstream to take appropriate action in response to them. These changes may necessitate updated to your integration code.
Setup Process
The Workbench installation can provision all components needed to start building blockchain applications. However, you can also manage all components individually by following this workflow.

Using an existing blockchain
Workbench uses a Proof-of-Authority Ethereum blockchain. Most know Ethereum to be the public blockchain platform with its Proof-of-Work consensus algorithm. Proof-of-Work is a Sybil-resistance mechanism that leverages computation costs to self-regulate the network and allow fair participation. This works great in anonymous, open blockchain networks where competition for cryptocurrency promotes security on the network. However, in private/consortium networks the underlying Ether has no value. An alternative protocol, Proof-of-Authority, is more suitable for permitted networks where all consensus participants are known and reputable. Without the need for mining, Proof-of-Authority is more efficient while still retaining Byzantine fault tolerance.
Follow the steps in the following official Microsoft documentation for deploying Ethereum PoA Consortium on Azure.
https://docs.microsoft.com/en-us/azure/blockchain/templates/ethereum-poa-deployment
Now you can select the “Use Existing” option in the Workbench deployment to connect to an existing Ethereum network. In this way, you can scale the underlying network at will. The network can exist anywhere, which means the network can be even on another cloud. The requirement is that the blockchain network is publicly accessible. Also, the PoA blockchain network should be configured to have gas price set to zero.
Create a new blockchain
When you choose “Create New”, it deploys a set of Ethereum PoA nodes within a single member’s subscription. This topology works great for situations where it’s ok to have one member manage all the blockchain nodes. When you choose “Use Existing”, you have the choice to deploy Workbench and point that deployment to an existing Ethereum PoA network. The topology of the network can be anything you want, including a multi-member blockchain network.
Register Azure AD Tenant
Blockchain Workbench deployment requires registration of an Azure AD application. You need an Azure Active Directory (Azure AD) tenant to register the app. You can use an existing tenant or create a new tenant. If you are using an existing Azure AD tenant, you need sufficient permissions to register applications, grant Graph API permissions, and allow guest access within an Azure AD tenant. Follow these steps to create the tenant. It’s important that you modify the manifest to use application roles within Azure AD to specify Blockchain Workbench administrators. Also, the API application needs to request permission from the user to access the directory.
Once workbench deployment is completed successfully, you can see the following resources.

There is a total of 37 deployments in a Workbench setup.
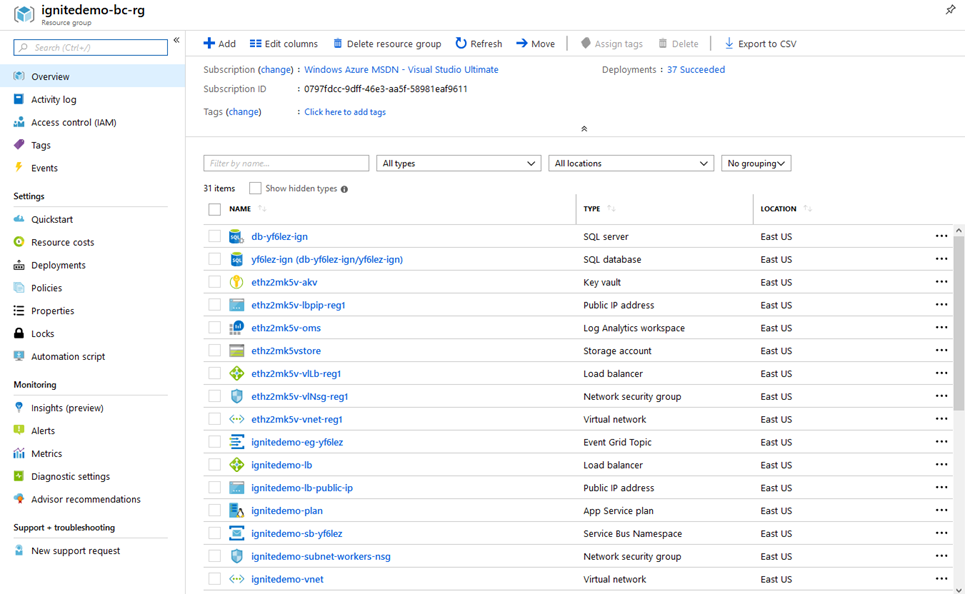
The services that are provisioned in case you don’t have an existing Ethereum network are:
- 2 app service plans (website and api)
- 1 Application insights
- 1 Event Grid Topic
- 2 Azure Key Vaults
- 1 SQL Database
- 2 Storage Accounts
- 1 Virtual Machine Scaleset (ledger nodes)
- 2 Virtual Machines (validator nodes)
You can access Azure Blockchain Workbench by navigating to its URL. You can find this URL by filtering the created resources on the type App Services. This will give you two resources. One is for the Workbench website, the other is for the REST API.
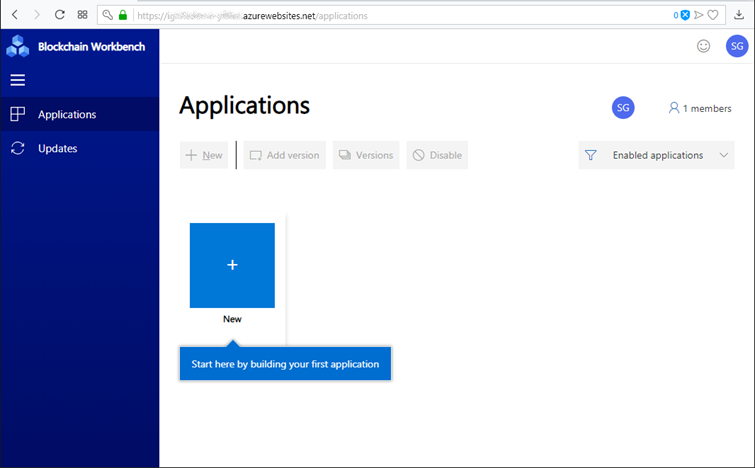
Creating your first blockchain application
You can now use the Blockchain Workbench website to create blockchain applications that represent multi-party workflows defined by configuration and smart contract code. There are four steps to take.
- Configuration
- Create a smart contract
- Add the application to Blockchain Workbench
- Add members to the blockchain application
Configuration
Configuration metadata defines the high-level workflows and interaction model of the blockchain application. Configuration metadata represents the workflow stages and interaction model of the blockchain application. This metadata is stored in a JSON format. Important elements in this file are:
- Application Roles (the different roles assigned to members of the application).
-
Workflows (referring to the relevant elements in the smart contract):
- Properties
- Functions
- States
A detailed description of the configuration can be found here.
Smart contract
Smart contracts represent the business logic of the blockchain application. Since Blockchain Workbench supports Ethereum for the blockchain ledger at this moment, we need to use Solidity as the programming language for writing self-enforcing business logic for smart contracts.
Deployment
You can upload the smart contract file and the metadata in the Workbench website.
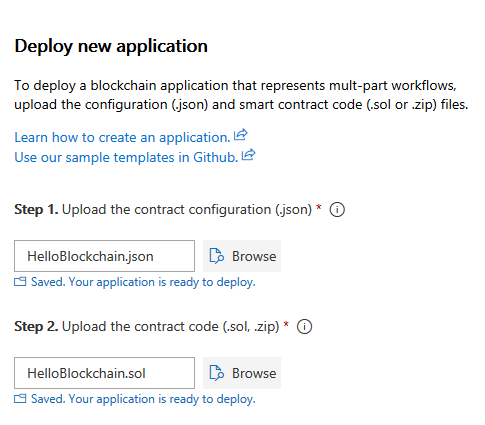
Note that the filename of the .sol-file needs to be the same as the application name stored in the .json-file. You can create and use multiple versions of an Azure Blockchain Workbench app. If multiple versions of the same application are uploaded, a version history is available and users can choose which version they want to use.
Interacting with blockchain applications
If you want to interact with the smart contract, you need to be authenticated. When you access the Workbench website, you’ll see an Azure AD-backed login experience where you can enter your work or personal Microsoft account credentials to access the application. Once you’re authenticated, you will be redirected to Workbench dashboard. This is where you can create new applications, but you can also start new workflows.
While nicely designed, the dashboard is not usually the way you want your users interacting with smart contracts. Therefore, there’s a Workbench REST API that provides developers and information workers with a way to build rich integrations to blockchain applications. This way you can create your own client that uses the Workbench REST API in the context of the signed-in user to do the following actions:
- List applications
- List workflows for an application
- List smart contract instances for a workflow
- List available actions for a contract
- Execute an action for a contract
To find out more about the REST API, you can navigate to the URL associated with the API. If you open this URL in a browser, a Swagger UI for the Blockchain Workbench deployment is displayed, listing the operations as listed in the table below.
| Operation Group | Description |
| Applications | Management of Blockchain Workbench blockchain applications. |
| Capabilities | List of capabilities a user can perform within Blockchain Workbench. |
| Checkers | Developer tools used to validate Workbench configuration and blockchain smart contracts. |
| Connections | Connection to blockchain networks. |
| Contracts | Smart contract instances, including ability to take actions on smart contracts. |
| Graph Proxy | Represents a proxy method to the Azure Active Directory Graph API for users. |
| Health | Health status of Blockchain Workbench API. |
| Ledgers | Supported blockchain networks. |
| Users | Management of users within Blockchain Workbench. |
HTTP requests to the REST API are protected with Azure Active Directory (Azure AD). To make an authenticated request to a REST API, clients have to be authenticated with valid credentials before you can call the API. Authentication is coordinated between the various actors by Azure AD, and provides your client with an access token as proof of the authentication. The token is then sent in the HTTP authorization header of each REST API request.
Let’s explore three ways to interact with the REST API: Postman, Service Principal and a Web App.
Postman
You can start testing and exploring the API by using a REST client tool such as Postman. The Postman client helps to quickly create complex HTTP requests. You can use Postman’s OAuth 2.0 authentication mechanism to obtain a bearer token by logging in using your user credentials. This is similar to how Workbench’s UI obtains the bearer token, and the token will have the same claims as your user.
To get the token, navigate to the Authorization tab in a request. Select OAuth 2.0 and click Get New Access Token. You will need to enter the following details.
| Token Name: | The name for your token |
| Grant Type: | Implicit |
| Callback URL: | The URL for Workbench UI |
| Auth URL: | https://login.microsoftonline.com/<tenant_name>/oauth2/authorize?resource=<workbench_appId> |
| Client id: | Workbench’s AppId |
| Scope: | empty |
| State: | A randomly generated GUID |
| Client Authentication: | Send client credential in body |
You can find the AppId by navigating to the App registrations in the Azure AD tenant. After you enter these details and click Request Token you will again see the Azure AD-backed login experience where you can enter your work or personal Microsoft account credentials. Check out the various samples to test and experiment with the API.
Service Principal
To access Workbench’s API programmatically you need to first create a service principal with certain configuration.
By default any service principal in Workbench’s active directory has access to Workbench resources just like any user in that directory. However, just like any user, all service principals by default only have User level access and not Admin level access. Admin level access is needed if you are trying to create Applications, read all applications, create users, and create role assignments. Since service principals act like users in a directory they can be assigned to different Workbench “application roles”. For example if you are trying to use a service principal to create contracts, you need to assign that service principal to the “creator” role of that application. Today this operation has to be done using the Workbench API as the UI does not allow for service principal role assignment. Here is a good article describing the steps needed to create the service principal. Since it is tricky to create a service principal and assign it to Workbench as an Admin, there’s also an automated a script to create a service principal and you have the option to make that service principal an Admin.
To interact with the API using the service principal just follow these steps:
- Create an AuthorizationContext with the address of the authority, e.g. https://login.microsoftonline.com/<tenant_name>
- Create a ClientCredential with the Client AppId and the Client Secret
- Request a token from the AuthorizationContext using the Workbench’s AppId and the ClientCredential
- Create an HttpClient and set the AuthenticationHeader to include the token.
Web App
A Web App can use Azure Active Directory for authentication, thus exploiting the Oauth2 integrated authorization mechanism. You can reuse the service principal from the previous section for this purpose, or register a new app in Azure Active Directory. Once the user has accessed the Web App using the credentials of a User in Azure Active Directory, it means that he has obtained an Authentication Token (Auth Code). In order to invoke the Blockchain APIs, however, the Web App must use its own Authentication Token (Auth Code) to obtain an Access Token to the Blockchain API resource. Once you have the Access Token you can finally use it (by inserting it in the request header) to invoke the Blockchain’s Rest API. So clearly, quite a number of steps are involved.
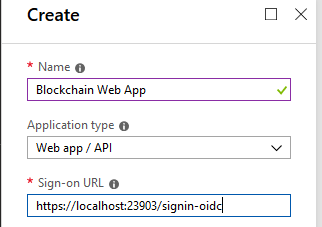
We begin by creating a new ASP.NET Core Web (MVC) project. Check the launchSettings.json file and note the application URL. Register an app in your Azure portal. From the Active Directory menu go to the App Registrations blad and add a new application registration with the following parameters.
You will need to set two features. The first is to authorize the app to use the Blockchain API. When an Access Token is requested, it will be created embedding in it the authorization to use the Blockchain API. Navigate to the registered app and open the Settings blade. From there, open the Required permissions blade. Choose to add a permission and select Blockchain API. To complete the operation do not forget to click on the “Grant Permission” button, otherwise you will have only set the permissions, but you will not have activated them.
The second feature is creating a key called the ClientSecret. This will be useful to prove your identity, i.e. your credentials, when requesting an Access Token. For the key go to the Properties of the app just registered and enter the blade Keys and produce the key, taking care to immediately store it as soon as it is created otherwise you will not be able to recover it.
We now have the necessary ingredients necessary in the Web App. These settings can be stored in the appsettings.json file.
{
"AzureAd": {
"Instance": "https://login.microsoftonline.com/",
"Domain": "*****.onmicrosoft.com",
"TenantId": "3b38c9da-da2b-412b-*****",
"ClientId": "dd6c924c-e752-4faf-*****",
"ClientSecret": "1fDanv8uUro8FSWPy******",
"CallbackPath": "/signin-oidc",
"WorkbenchResourceId": "da9a0af8-b32d-4f5a-*****",
"WorkbenchBaseAddress": "https://***-api.azurewebsites.net/"
},
"Logging": {
"LogLevel": {
"Default": "Warning"
}
},
"AllowedHosts": "*"
}
Within our Web App, the AccountController handles the login to the configured Azure AD tenant. Once authenticated, we can call the Workbench REST API.
// Because we signed-in already in the WebApp, the userObjectId is know
string userObjectID = (User.FindFirst("http://schemas.microsoft.com/identity/claims/objectidentifier"))?.Value;
// Using ADAL.Net, get a bearer token to access the Blockchain Workbench API
AuthenticationContext authContext = new AuthenticationContext(AzureAdOptions.Settings.Authority,
new NaiveSessionCache(userObjectID, HttpContext.Session));
ClientCredential credential = new ClientCredential(AzureAdOptions.Settings.ClientId, AzureAdOptions.Settings.ClientSecret);
result = await authContext.AcquireTokenSilentAsync(AzureAdOptions.Settings.WorkbenchResourceId, credential,
new UserIdentifier(userObjectID, UserIdentifierType.UniqueId));
HttpClient client = new HttpClient();
client.DefaultRequestHeaders.Authorization = new AuthenticationHeaderValue("Bearer", result.AccessToken);
var response = await client.GetAsync($"{AzureAdOptions.Settings.WorkbenchBaseAddress}/api/v2/applications");
ViewBag.Response = await response.Content.ReadAsStringAsync();
Azure Blockchain Development Kit
The REST API allows you to interact with the blockchain by means of json formatted messages. The Azure Blockchain Development kit, introduced in November 2018, extends the capabilities of our blockchain developer templates and Azure Blockchain Workbench, which incorporates Azure services for key management, off-chain identity and data, monitoring, and messaging APIs into a reference architecture that can be used to rapidly build blockchain-based applications. The kit features:
- Polly.NET (https://github.com/App-vNext/Polly) a .NET resiliency library with exponential retry backing
- Singleton Implementation – just include the library in your project and reference it from anywhere
- Thread-safe: only a single HttpClient is used
- Event Handlers you can subscribe to:
- For expired access tokens (so you can refresh and get a new one)
- When Exceptions are thrown
- Exception handling – JsonException, TaskCancelledException, HttpRequestException
- Generic GET and POST methods with C# Generics
NOTE: There is another way to interact with the blockchain app: messaging integration. Messaging integration facilitates interaction with systems, services, and devices where an interactive sign-in is not possible or desirable. Messaging integration focuses on two types of messages: messages requesting transactions be executed on a distributed ledger, and events exposed by that ledger when transactions have taken place. This method will be the topic of a future article.
Closing remarks
The key to adoption of a new technology is facilitating developers in the process of creating new and innovative solutions. With Azure Blockchain Workbench, the services and tools are available to achieve just that. It provides the infrastructure scaffolding for building blockchain applications and enables developers to focus on creating business logic and smart contracts. The REST API is an essential element to provide users with a familiar interface and still have the trust that data is stored securely and in a decentralized way.
Resources
The sample code for this article can be found at https://github.com/sander-/awb-demo.
Other useful resources:
- https://medium.com/byteridge/deploying-blockchain-applications-using-azure-blockchain-workbench-exploring-various-d0c32f495e07
- http://blog.pomiager.com/post/using-rest-api-in-azure-workbench-blockchain
- https://medium.com/@malirezaie/how-to-enable-programmatic-interaction-with-azure-blockchain-workbench-apis-56c0d95c79c0
- https://social.msdn.microsoft.com/Forums/en-US/home?forum=azureblockchain
- http://aka.ms/bcblocktalk
- http://aka.ms/tryworkbench
- http://aka.ms/bcdevkit
- https://aka.ms/workbenchforum
- https://aka.ms/blockchainuservoice