

Given that .NET Core, as a runtime, is a both open source and multiplatform it’s easy to understand the desire to run your ASP.NET Core project on a Linux host. Practically always you can find a Linux webhost cheaper than a Windows webserver. So .NET Core gives us developers the opportunity to build a web application in the language with probably the widest reach (yes, that’s C#) and host that on virtually any server platform.
For the purpose of this article, we are creating a ASP.NET Core website with Visual Studio Code, setting up a Linux host with Apache webserver, and deploying the site with Deploy, a VS Code Extension for deploying files in a workspace to a multitude of destinations.
Setting up a Linux host
There are many service providing offering a cheap Linux based VPS (virtual private server). Amazon offers a free tier, where you can run a single core, 1GB RAM instance for up to 12 months for free. After that, it’s about 9 USD/month. The instance we select is an Ubuntu Server 16.04 LTS (HVM) with 8GB of storage (SSD). Note that we connect to this instance through SSH, and the AWS console allows you to create a public/private key pair to connect securely to the instance. On a Windows machine, you can use mRemoteNG to connect to a Linux machine. However, connecting to Linux instances that run on AWS requires a bit more than just SSH client. Linux EC2 instances have password authentication disabled by default to prevent brute-force attacks and want you to supply your private key instead. But there is no such field in mRemoteNG configuration pane! Here is a detailed instruction on setting up your connection using mRemoteNG.
To install .NET Core on linux, we are using the same steps as described in this article.
We can install .NET Core using Ubuntu’s package manager, apt. The instruction can be found here, but make sure you are using the commands for Ubuntu 16.04 / Linux Mint 18.
sudo sh -c 'echo "deb [arch=amd64] https://apt-mo.trafficmanager.net/repos/dotnet-release/ trusty main" > /etc/apt/sources.list.d/dotnetdev.list'
sudo apt-key adv --keyserver hkp://keyserver.ubuntu.com:80 --recv-keys 417A0893
sudo apt-get update
We use the following command to list the available releases of .NET Core.
apt-cache search dotnet-dev
At the time of writing the last entry in the list is this one.
dotnet-dev-2.0.0-preview1-005977 - Microsoft .NET Core 2.0.0 - SDK Preview 1
We can install it using this command.
sudo apt-get install dotnet-dev-2.0.0-preview1-005977
Since we are using a sudo command, these operations get executed with root privileges. It will ask you for your regular user’s password to verify your intentions.
Configuring Apache as a reverse proxy
Kestrel is the web server that is included by default in ASP.NET Core new project templates. It is a cross-platform web server for ASP.NET Core based on libuv, a cross-platform asynchronous I/O library. If your application accepts requests only from an internal network, you can use Kestrel by itself.

(source: https://docs.microsoft.com/en-us/aspnet/core/fundamentals/servers/kestrel)
However, if you expose your application to the Internet, you must use IIS, Nginx, or Apache as a reverse proxy server. A reverse proxy server receives HTTP requests from the Internet and forwards them to Kestrel after some preliminary handling.

In our example, we are going to setup and configure Apache to handle the requests and forward them to Kestrel.
To install Apache on Ubuntu, use the following command.
sudo apt-get install apache2
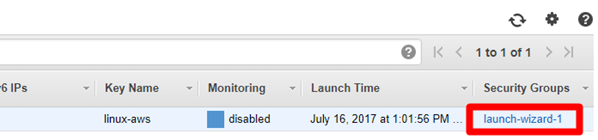
By default, your AWS instance has a network security setting to prohibit inbound traffic on port 80. You need to configure the security group in AWS. To do this, navigate to your instance in the AWS console, scroll to the right and click on the name of the security group. This way, you are sure to edit the security group for the instance, and not some other security group.
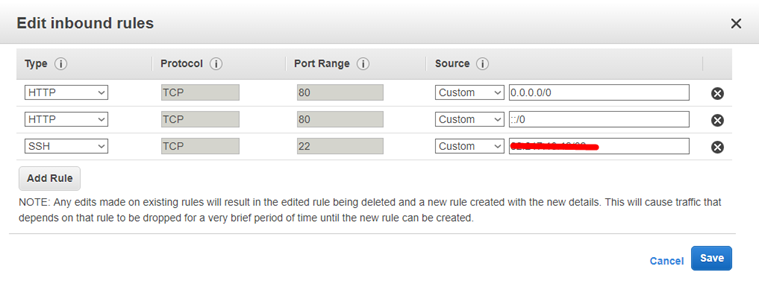
On the inbound tab, click Edit.

You can now add a rule for HTTP traffic. This will actually create two rules, one for IPv4 and one for IPv6.
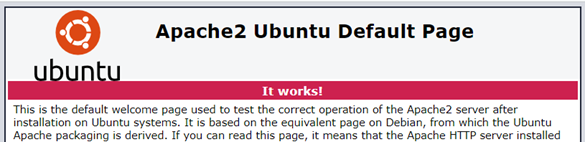
If you now navigate to the IP address of your host, you should see the default Apache page.
Now, we need enable the modproxy modules to in Apache server to make it work as a reverse proxy. modproxy is the Apache module for redirecting connections (i.e. a gateway, passing them through). It is enabled for use just like any other module and configuration is pretty basic (or standard), in line with others. modproxy is not just a single module but a collection of them, with each bringing a new set of functionality. You enable the modules with this command.
a2enmod proxy proxy_http proxy_html
Configuration files for Apache are located within the /etc/apache2/conf-enabled/ directory. Any file with the .conf extension will be processed in alphabetical order in addition to the module configuration files in /etc/apache2/mods-enabled/, which contains any configuration files necessary to load modules.
To create a configuration file, use the following command
sudo nano /etc/apache2/conf-enabled/aspnetcoredemo.conf
This is content of the the configuration file.
<VirtualHost *:80>
ProxyPreserveHost On
ProxyPass / http://127.0.0.1:5000/
ProxyPassReverse / http://127.0.0.1:5000/
ErrorLog /var/log/apache2/aspnetcoredemo-error.log
CustomLog /var/log/apache2/aspnetcodedemo-access.log common
</VirtualHost>
The VirtualHost node, of which there can be multiple in a file or on a server in many files, is set to listen on any IP address using port 80. The next two lines are set to pass all requests received at the root to the machine 127.0.0.1 port 5000 and in reverse. For there to be bi-directional communication, both settings ProxyPass and ProxyPassReverse are required.
Logging can be configured per VirtualHost using ErrorLog and CustomLog directives. ErrorLog is the location where the server will log errors and CustomLog sets the filename and format of log file. In our case this is where request information will be logged. There will be one line for each request.
Press CTRL-X and Y to save and exit the editor.
Now restart Apache using this command.
sudo service apache2 restart
If you want to check logging on the startup sequence, type the following command.
journalctl -xe
Apache is now configured to forward requests made to http://localhost:80 on to the ASP.NET Core application running on Kestrel at http://127.0.0.1:5000. If you want to try it out, and see that it is working, we first need to have a ASP.NET Core website. There are several options here. You can deploy one from your local machine, if you have one available. Or you can create a basic website with the dotnet new command. Since we will deploying a locally developed site later in this article, and we want to know if our configuration is ready to accept and run that site, we are going forward with a boilerplate website. First, make sure that you are still in your home folder. You can always navigate to your home folder with the command cd ~. In this folder, we are creating a site using the following commands.
mkdir aspnetcoredemo
cd aspnetcoredemo/
dotnet new mvc
When the last command is finished, you will have a basic MVC website. We are not going to run this website from your home folder, but rather deploy it to a subfolder of /var. This is not a requirement, but more of a convention. Ubuntu uses the folder /var/www/html as the default root for Apache. Publishing the MVC website is done like this.
dotnet publish
sudo cp -a ~/aspnetcoredemo/bin/Debug/netcoreapp2.0/publish/ /var/aspnetcoredemo/
While, Apache is not set up to manage the Kestrel process. We will use systemd and create a service file to start and monitor the underlying web app. systemd is an init system that provides many powerful features for starting, stopping and managing processes.
We can create a configuration file using the following command
sudo nano /etc/systemd/system/kestrel-aspnetcoredemo.service
The content of the .sevice file is as follows.
[Unit]
Description=Example ASP .NET Web Application running on Ubuntu 16.04
[Service]
WorkingDirectory=/var/aspnetcoredemo
ExecStart=/usr/bin/dotnet /var/aspnetcoredemo/aspnetcoredemo.dll
Restart=always
RestartSec=10
SyslogIdentifier=dotnet-demo
User=www-data
Environment=ASPNETCORE_ENVIRONMENT=Production
[Install]
WantedBy=multi-user.target
The various locations configured in this file obviously matter, and if the site fails to run, it’s very likely related to these settings. It seems that the location of the dotnet command differs between Linux-distributions, so use the whereis dotnet command to find out where it is on your machine.
If you completed the configuration and save the .service file, you need to enable it, and start it.
sudo systemctl enable kestrel-aspnetcoredemo.service
sudo systemctl start kestrel-aspnetcoredemo.service
If all went well, you should be able to navigate to the IP address of your host and see the default start page of an ASP.NET Core MVC project.

Publishing from Visual Studio Code
There are many options for publishing your locally developed web application to a webserver. While professional development teams rely on continuous deployment tools like Octopus Deploy, Electric Flow, or Jenkins it’s still valid to simply deploy an application from your own machine using (s)FTP or copy. Deploy is an extension for Visual Studio Code that provides commands to deploy files of a workspace to a destination. Install this extension in VS Code by pressing CTRL-Shift-P and the Extensions: Install Extensions command. Since we have set up our webserver to run ASP.NET Core 2.0 Preview, it makes sense to create a .NET Core 2.0 project in Visual Studio Code. If you have not done so already, download and install the preview from https://www.microsoft.com/net/core/preview#windowscmd. This is assuming you are running VS Code on a Windows machine, but you can use Linux or MacOS as well.
Once installed, create a new ASP.NET MVC project through these commands in the terminal window of VS Code.
dotnet new
dotnet build
The deployment configuration is Workspace dependent (usually, since you probably have more than one project on your development machine). To create a workspace specific setting, press CTRL-, and go to the Workspace Settings tab. Here, you can enter the following deployment settings.
// Place your settings in this file to overwrite default and user settings.
{
"deploy": {
"packages": [
{
"name": "Version 1.0",
"description": "Website Version 1.0",
"files": ["bin/Debug/netcoreapp2.0/publish/**"]
}
],
"targets": [
{
"type": "sftp",
"name": "AWS Linux",
"description": "Remote Linux Server",
"dir": "/var/aspnetcoredemo",
"host": "123.123.123.123", "port": 22,
"checkBeforeDeploy": true,
"privateKey": "C:\\Users\\....\\linux-aws.ppk",
"user": "ubuntu"
}
]
}
}
Since we are already using SSH to connect to our webserver at Amazon, it’s quite convenient to use SFTP (SSH FTP) for deployment. Make sure you know where your SSH private key file is located.
When you are ready to deploy, run the dotnet publish command first. Then, press CTRL-Shift-P and type Deploy:. Choose Deploy Workspace from the list of commands.
If all went well, you should see

Use a browser to navigate to your webhost, and you should see the site based on your local version.
Note:
It’s possible that the site is no longer running. This can be due to several issues:
You may have a .NET Core 2.0 Preview 2 version running locally, whereas the server still runs Preview 1. To update the version on the server, run these commands.
sudo apt-get remove dotnet-dev-2.0.0-preview1-005977
sudo apt-get install dotnet-sdk-2.0.0-preview2-006497
Another issue could be that the projects’ assembly, after publishing, is no longer aspnetcoredemo.dll, like we configured to test the correct installation of the various components. In that case, modify the kestrel-aspnetcoredemo.service file located in /etc/systemd/system/kestrel-aspnetcoredemo.service to reflect the new assembly.
More information
https://docs.microsoft.com/en-us/aspnet/core/publishing/apache-proxy
https://www.microsoft.com/net/core#linuxubuntu
https://docs.microsoft.com/en-us/aspnet/core/publishing/linuxproduction
Great walkthrough – worked like a champ on my Ubuntu 18.04 LTS server!