

Azure Functions is a serverless compute service that enables you to run code on-demand without having to explicitly provision or manage infrastructure. This means that you can use Azure Functions to run a script or piece of code in response to a variety of events.
In other words, Azure Functions lets you execute your code in a serverless environment without having to first create a VM or publish a web application. A function app is comprised of one or more individual functions that are managed together by Azure App Service. Functions written in multiple languages can all share the same function app. Think of a function app as a way to organize and collectively manage your functions. If you don’t have an Azure subscription, you can create a free account before you begin.
Visual Studio Code
As this post is about creating Azure Functions with Visual Studio Code, you will obviously need to have this free and open source IDE running on your machine. Visual Studio Code is a lightweight but powerful source code editor which runs on your desktop and is available for Windows, macOS and Linux. It comes with built-in support for JavaScript, TypeScript and Node.js and has a rich ecosystem of extensions for other languages (such as C++, C#, Python, PHP, Go) and runtimes (such as .NET and Unity). You can download Visual Studio code here: https://code.visualstudio.com/
If you are not familiar with VS Code, check out the introduction first and review a couple of introductory videos.
Azure Tools for Visual Studio Code
When you are ready to go, and have an Azure subscription and VS Code, the first thing to install is the Azure Tools for Visual Studio Code. This extension for Visual Studio Code gives Azure developers some convenient commands for creating or accessing resources directly in the editor. Launch VS Code Quick Open (Ctrl+P), paste the following command, and press enter.
ext install azuretoolsforvscode
You now have a set of Azure related function at your fingertips. Press CTRL-Shift-P for the list.
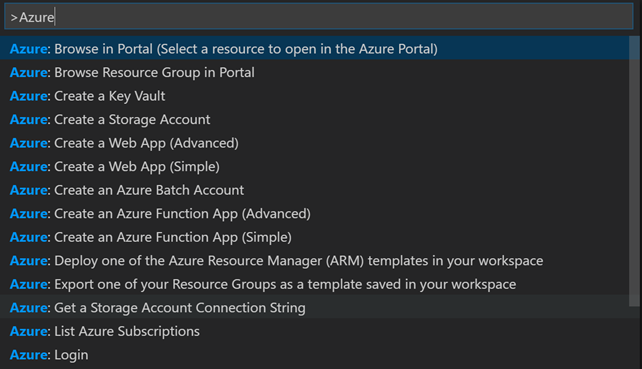
You see that you can create an Azure Function by selecting Create an Azure Function App. The difference between Advanced and Simple is that with the Simple option, all related resources are automatically generated for you.
But before you can create a function, you need to login to Azure first.

When you run the Azure Login command (select Azure: Login from the command list), a code is generated to manage Azure from the command line through what’s called the Microsoft Azure Cross-platform Command Line Interface. If you open a command prompt and type azure, you can see what commands are available. But first, run the Azure Login command from VS Code, and the code is both displayed as well as copied to the clipboard.

Click on the Sign In button to open a browser an login to your Azure subscription. Then you can paste the code, and you are authenticated to use Azure from the command line. If you have multiple subscriptions, use the command Azure: List Azure Subscriptions from VS Code.
Note: Logging in with a Microsoft Account?
If you’re logging in using a Microsoft account (such as a @hotmail.com, @live.com, or @outlook.com account)
you will need to set the azure.tenantId setting. Access the setting through File -> Preferences -> User Settings feature, and search for tenantId.
To find out the value of your tenantId, use the following command
azure account list
This will give you the following output.

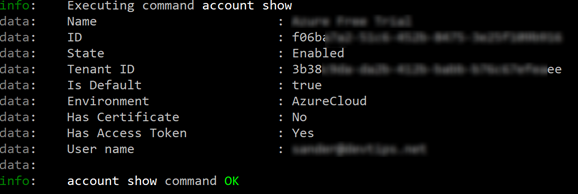
The Id value list here is not your tenantId. First, you set the desired subscription as current. And then you can use the command azure account show to display the tenantId
azure account set f06…..

azure account show
So, back to creating the azure function. If you are authenticated, and selected the correct subscription, you can start by creating a simple Azure Function. Press CTRL-Shift-P for the list of commands and choose Create an Azure Function App (Simple). This will create the required resources for you in Azure. Navigate to the Azure Portal, and go to Function Apps to see if your Function App is there. When you start, your Function App is empty. There are no functions defined. There are several options to choose and start with a premade function, based on a scenario:
- Webhook + API
- Timer
- Data processing
We are not going to discuss all these options. The best way to learn about the various options is here: https://docs.microsoft.com/en-us/azure/azure-functions/. In Azure Functions, specific functions share a few core technical concepts and components, no matter what language or binding you use. Before you jump into learning details specific to a given language or binding, be sure to read through an overview that applies to all of them: Azure Functions developers guide
Function code
You write code for a function in a language of your choice and save the code and configuration files in the same folder. The configuration is named function.json, which contains JSON configuration data. Various languages are supported, and each one has a slightly different experience optimized to work best for that language. Regardless of the language you choose for implementing your function, you need to have this function.json file. Here’s an example for a trigger based function.
{

  "bindings": [

    {

      "authLevel": "anonymous",

      "name": "req",

      "type": "httpTrigger",

      "direction": "in",

      "route": "HttpTriggerCSharp/name/{name}",

      "methods": [

        "get"

      ]

    },

    {

      "name": "$return",

      "type": "http",

      "direction": "out"

    }

  ],

  "disabled": false

}
There’s a runtime, or script host, which is the underlying WebJobs SDK host that listens for events, gathers and sends data, and ultimately runs your code. In the following example, we are using C# Script. The C# script experience for Azure Functions is based on the Azure WebJobs SDK. Data flows into your C# function via method arguments. Argument names are specified in function.json, and there are predefined names for accessing things like the function logger and cancellation tokens. The .csx format allows you to write less “boilerplate” and focus on writing just a C# function. Include any assembly references and namespaces at the beginning of the file as usual. Instead of wrapping everything in a namespace and class, just define a Run method. If you need to include any classes, for instance to define Plain Old CLR Object (POCO) objects, you can include a class inside the same file. Here’s an example of a Run method.
public static HttpResponseMessage Run(HttpRequestMessage req, string name, TraceWriter log)

{

    log.Info("C# HTTP trigger function processed a request.");


    var response = new HttpResponseMessage(HttpStatusCode.OK);

    MemoryStream stream = new MemoryStream();

    var httpClient = HttpClientSingle.HttpClient;

    var url = "https://www.niederschlagsradar.de/image.ashx";

    var result = httpClient.GetByteArrayAsync(url).Result;

    response.Content = new ByteArrayContent(result);

    response.Content.Headers.ContentType = new MediaTypeHeaderValue("image/png");

    return response;

}

public static class HttpClientSingle

{

    public static readonly HttpClient HttpClient;


    static HttpClientSingle()

    {

        HttpClient = new HttpClient();

    }

}
If you implement this code in your C# Script file, you may notice that IntelliSense is missing. To correct this, you can download the nuget packages for System.Web.Http and Microsoft.Azure.WebJobs. If you have the nuget package manager installed, run these commands:
nuget.exe install System.Web.Http

nuget.exe install Microsoft.Azure.WebJobs
Now, you can reference the assemblies in run.csx
#r "..\\System.Web.Http.4.0.0\System.Web.Http.dll"

#r "..\\Microsoft.Azure.WebJobs.2.0.0\lib\net45\\Microsoft.Azure.WebJobs.Host.dll"


using System;

using System.Net;

using System.Net.Http;

using System.Net.Http.Headers;

using System.Threading.Tasks;

using Microsoft.Azure.WebJobs.Host;
There are various options to deploy your Azure Function. In the Functions Apps overview page, you can download a publishing profile and use MSBuild for publishing. You can also find the FTP credentials in this file and simply use an FTP client to upload the files. It’s basically the same as publishing a Web App.
Some tips
If you plan to use the HTTP or WebHook bindings, plan to avoid port exhaustion that can be caused by improper instantiation of HttpClient. For more information, review the article Improper Instantiation antipattern. Avoid long running functions. Large, long-running functions can cause unexpected timeout issues. A function can become large due to many dependencies. Importing dependencies can also cause increased load times that result in unexpected timeouts. Dependencies are loaded both explicitly and implicitly. A single module loaded by your code may load its own additional modules. You can use classes and methods defined in other .csx files in your run.csx file. To do that, use #load directives in your run.csx file. You can use your Visual Studio Code and local development tools to run the Azure Functions runtime locally. Trigger on events in Azure and debug C# and JavaScript functions. To find out how, check out this article: https://docs.microsoft.com/en-us/azure/azure-functions/functions-run-local