

Cloud9 combines a powerful online code editor with a full Ubuntu workspace in the cloud. You can sign up for free, and create free workspaces. So it’s easy to try out some new coding language or framework without the hassle of installing (and perhaps uninstalling) everything on your personal machine. The Cloud9 IDE supports many different programming languages, including C#. With the .NET Framework coming to Linux in the form of .NET Core, this presents a fine chance to try out the features of .NET Core on Linux, without the need to install Linux on your own machine.
A Cloud9 workspace does not come with .NET Core installed and ready to go, but with a few steps, you are good to go.
The first thing to have is an account on the platform. You can create an account with your email address, but also sign in with your Github or Bitbucket account.
Once logged in, from the dashboard, create a new workspace by clicking the “Create a new workspace” button:

From here, you’re taken to the workspace creation screen and you’ll first set your project name (choose wisely as you cannot rename a workspace) and description (optional but usually helpful).

Then you’ll decide if this is a public or private workspace. You can always change this one later by checking out how to share a workspace.
If you have a workspace in a git repository (GitHub, BitBucket, Gitlab, or any other), you can paste your git URL in the next textbox, otherwise leave this box blank. This way, you can clone that workspace.
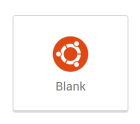
There are a number of templates available to get you started. As you can imagine, these templates have the necessary resources already installed. .NET Core is not one of them, so here it’s best to choose Blank.
Click Create Workspace and a workspace is created for you to use.

In order to start using .NET Core in your workspace, we need to install the packages. You can find out which Linux distribution you are running with this command: lsb_release -a
sander_:~/workspace $ lsb_release -a
No LSB modules are available.
Distributor ID: Ubuntu
Description: Ubuntu 14.04.3 LTS
Release: 14.04
Codename: trusty
sander_:~/workspace $
So you see, we are using Ubuntu 14.04. In order to install .NET Core on Ubuntu or Linux Mint, you need to first set up the apt-get feed that hosts the package you need. These are the commands to run:
sudo sh -c 'echo "deb [arch=amd64] https://apt-mo.trafficmanager.net/repos/dotnet-release/ trusty main" > /etc/apt/sources.list.d/dotnetdev.list'
sudo apt-key adv --keyserver hkp://keyserver.ubuntu.com:80 --recv-keys 417A0893
sudo apt-get update
These steps are also published here: https://www.microsoft.com/net/core#linuxubuntu
You may get the following error after running the last command.
sander_:~/workspace $ sudo apt-get update
E: The method driver /usr/lib/apt/methods/https could not be found.
N: Is the package apt-transport-https installed?
If this is the case, run the following command.
sudo apt-get install apt-transport-https
However, you may then encounter the following error.
E: Unable to locate package apt-transport-https
To fix this, we first need to remove the file dotnetdev.list that holds the packages for .NET Core.
sudo rm /etc/apt/sources.list.d/dotnetdev.list
Then, we update the list again.
sudo apt-get update
And now we can install the https package.
sudo apt-get install apt-transport-https
It seems that the https package issue is caused by a bug in the installer scripts used in setting up workspaces: https://community.c9.io/t/installing-apt-transport-https-issue/10994/14
Anyway, back to installing .NET Core. If you encountered the https package issue and resolved it, we need to add the packages list again.
sudo sh -c 'echo "deb [arch=amd64] https://apt-mo.trafficmanager.net/repos/dotnet-release/ trusty main" > /etc/apt/sources.list.d/dotnetdev.list'
sudo apt-get update
We can now find out which .NET Core packages are available to use.
apt-cache search dotnet-dev
Here is the output at the time of writing this post.
sander_:~/workspace $ apt-cache search dotnet-dev
dotnet-dev-1.0.0-preview2-003121 - Microsoft .NET Core 1.0.0 - SDK Preview 2
dotnet-dev-1.0.0-preview2-003131 - Microsoft .NET Core 1.0.1 - SDK 1.0.0 Preview 2-003131
dotnet-dev-1.0.0-preview2-003156 - Microsoft .NET Core 1.0.3 - SDK 1.0.0 Preview 2-003156
dotnet-dev-1.0.0-preview2-1-003177 - Microsoft .NET Core 1.1.0 - SDK 1.0.0 Preview 2.1-003177
dotnet-dev-1.0.0-preview2.1-003155 - Microsoft .NET Core 1.1.0 Preview1 - SDK 1.0.0 Preview 2.1-003155
dotnet-dev-1.0.0-preview3-004056 - Microsoft .NET Core 1.0.1 - SDK Preview 3
dotnet-dev-1.0.0-preview4-004233 - Microsoft .NET Core 1.0.1 - SDK Preview 4
dotnet-dev-1.0.0-rc3-004530 - Microsoft .NET Core 1.0.3 - SDK RC 3
dotnet-dev-1.0.0-rc4-004769 - Microsoft .NET Core 1.0.3 - SDK RC 4
dotnet-dev-1.0.0-rc4-004771 - Microsoft .NET Core 1.0.3 - SDK RC 4
dotnet-dev-1.0.1 - .NET Core SDK 1.0.1
dotnet-dev-1.0.3 - .NET Core SDK 1.0.3
dotnet-dev-1.0.4 - .NET Core SDK 1.0.4
dotnet-dev-2.0.0-preview1-005977 - Microsoft .NET Core 2.0.0 - SDK Preview 1
Note: if you are really adventurous, you can try out the daily builds by following these commands: https://github.com/dotnet/core-setup/blob/master/README.md#debian-daily-feed. However, you may have difficult time setting everything up, since dependencies sometimes fail to install.
We can see that .NET Core 2.0 preview is available. Here’s how to install.
sudo apt-get install dotnet-dev-2.0.0-preview1-005977
If it installed correctly, you can find out the running version.
sander_:~/workspace $ dotnet --info
.NET Command Line Tools (2.0.0-preview1-005977)
Product Information:
Version: 2.0.0-preview1-005977
Commit SHA-1 hash: 414cab8a0b
Runtime Environment:
OS Name: ubuntu
OS Version: 14.04
OS Platform: Linux
RID: ubuntu.14.04-x64
Base Path: /usr/share/dotnet/sdk/2.0.0-preview1-005977/
Microsoft .NET Core Shared Framework Host
Version : 2.0.0-preview1-002111-00
Build : 1ff021936263d492539399688f46fd3827169983
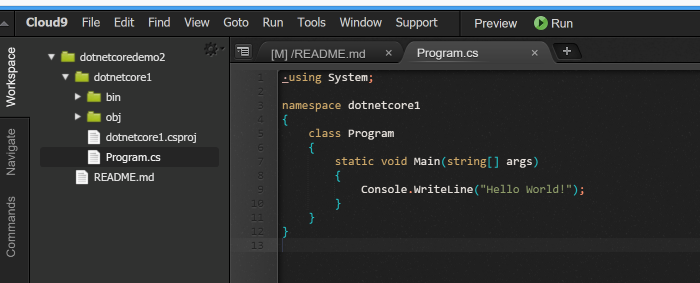
To start with your first project, create a new folder.
mkdir dotnetcore1
cd dotnetcore1
The dotnet command has a number of parameters, one of which will help you in setting up the basis for your code. You can find out which project templates are available by using this command.
dotnet new -l
So to create console app, we need to do this.
dotnet new console
If everything went well, this should work.
sander_:~/workspace/dotnetcore1 $ dotnet run
Hello World!
You can navigate through your code, and obviously make changes, by using the Cloud9 IDE.
Conclusion
If you look at the various Microsoft resources online, it may seem pretty easy to install .NET Core on a Linux machine. Just a few commands, and you are good to go. However, when things go sideways, Linux has a way of presenting you with information, that give very little clue as to how to resolve it. That is why this article also discusses when things do not follow the 1, 2, 3 approach. As Windows users, we are mostly used to the Install, Next, Next, Go method. Development on a Linux machine does not always work this way. But the Cloud9 workspace gives you a good opportunity to dive into it, learn it, and fix it, without messing up your daily development box. Not only can you comfortable experiment with development on Linux, but also with .NET Core previews as well.
Happy coding!
Nice one. Thank you! 🙂
Hello and thank you for this! I am trying to develop a simple program to read/edit/process JSON files in C# so I used your guide to set up a C9 workspace and get .NET and C#. I may have hit a stumbling block in trying to get access to JSON.NET or whatever is needed to use the various functions. Can you provide any pointers? TY.
@Tom: you can edit the .csproj file in your project folder and add this:
<blockquote>
<ItemGroup>
<PackageReference Include=”Newtonsoft.Json” Version=”10.0.2″ />
</ItemGroup>
</blockquote>
If you run dotnet restore the required files will be retrieved and you should be able to use all Json.NET functions.